
5 Key Lash Isolation Tips for Beginner Lash Artists
Lash isolation is a critical skill for lash artists, but one that almost everyone struggles with at first. We’ve all been there – it looks super easy when the pros do it, but it’s a totally different story once you’ve got the tweezers in your hand!
But if you want to build a career as a successful lash tech, it’s absolutely vital that you get comfortable with proper lash isolation. Not only will it speed up appointments, it’s crucial for maintaining the health of your clients’ natural lashes.
In this post, we’re sharing our tried-and-tested tips for lash isolation that will have you lashing faster and better in no time.
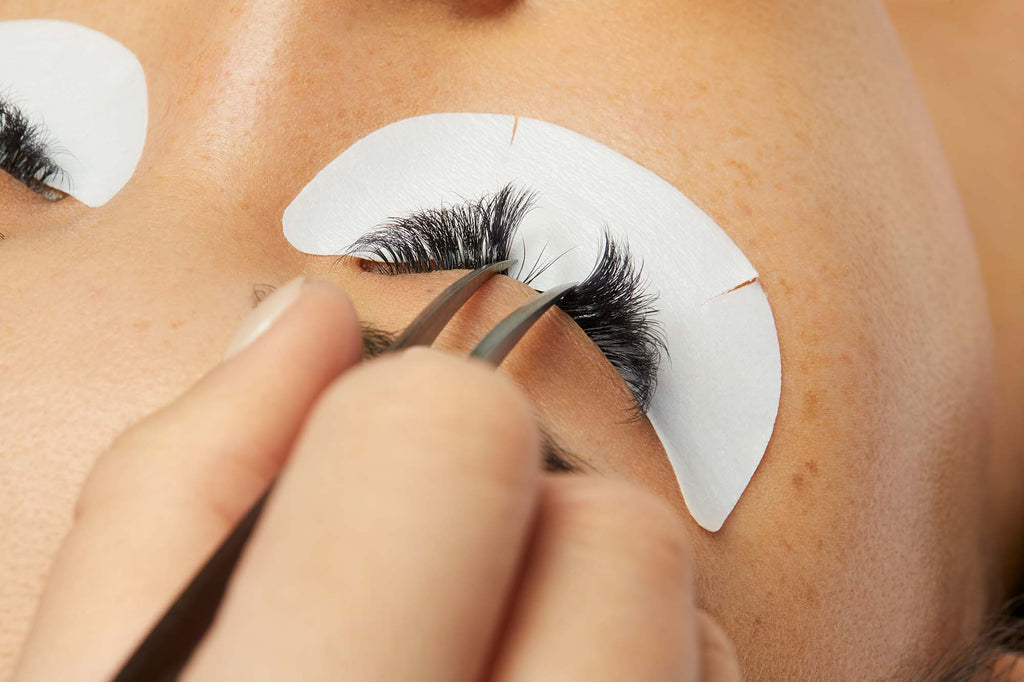
Don’t Limit Yourself to One Set of Isolation Tweezers
 There’s so much variety when it comes to eye shape and natural lash type – so it doesn’t make sense to have a one-size-fits-all approach to lash isolation.
 The best lash technicians will have a range of isolation tweezers on hand to use throughout their appointments.
A classic pair of straight tweezers will help you to quickly sift through the natural lashes. Many artists swear by a pair of curved isolation tweezers when it comes to sorting and separating unruly, straight lashes too.
A shorter isolation tweezer like the Iso Crane gives you greater control over smaller lashes, like those little baby lashes that are so easy to miss during application. And then a longer, slanted pair such as our Iso Slim can help you to access lashes in those hard-to-reach corners of the eye.
The main thing to remember is that no two lash artists’ hands are the same. What works for another technician may not work for you! That’s why it’s best to practice with a variety of isolation tweezers, so you can get a sense of which tools help you to work at your best.
Our Pro-Classic and Pro-Volume kits each contain a range of premium lash tweezers, including multiple options for isolation. They’re a great, cost-effective way to stock up on the tools of the trade.
Communicate With Your Client!
We’ve known plenty of lash artists to give themselves unnecessary neck pain from contorting themselves into all sorts of positions around their client. Don’t be afraid to ask your clients to tilt their head to the left or right to give you a better view of the corners of their eyes!
Of course, make sure to keep things gentle and relaxing, but it’s completely acceptable to ask your client to adjust their position slightly. A small adjustment on their part can shave minutes off their appointment time by giving you better visibility over their lashes.
It’s much better to gently ask a client to turn their head, than to deliver a substandard set of extensions because you weren’t able to properly isolate their natural lashes.
Make Tape Your Best Friend
One of the best things you can do as a beginner lash tech is to practice maneuvering lashes and lids with microporous tape. It’ll help you to speed up your isolation whilst being gentle on your clients’ natural lashes.
Here are three key ways to make use of tape during your lash isolation:
 Stretch the Lash Line
By applying a strip of tape horizontally across the eyelid, you can gently stretch the lid left or right without causing your client discomfort or opening up their eye.
Using tape in this way will help you to stretch out the lash line and speed up the time it takes to select and isolate the natural lashes.
Lift Lashes Away from Pads
Some clients have a tendency to close or even squeeze their eyes quite tightly during their appointment. Others just have lashes that have a natural downward incline. For both these client types, it can be hard to pick the natural lash up off the eye pad.
With a small strip of tape applied vertically to the eyelid (that is, pointing up from the eye toward the brow), you can maneuver the lid upward slightly and lift the lashes away from the pad. Make sure you do this with a very light touch – you don’t want to wrench the eyelid open and interrupt that all-important lash nap!
Keep Extensions Out of the Way
Finally, tape is a useful way to keep already-extended lashes out of the way as you work – particularly for clients with densely-layered natural lashes.
Depending on the stickiness of the tape you’re using, you may want to de-tack your strips on your arm before using them on your extensions. Then, simply tape back the tips of the extensions onto the eyelid to reveal the layer of natural lashes below.
You can also use eye pads for this – again, just make sure they’re not too sticky before you apply.
 Use Magnifying Glasses
Specialist magnifying glasses can be an absolute game-changer for lash isolation. They make it super easy to pick up on those thinner lashes, and you’ll get a better view of the quality of your application.
More importantly, magnifying glasses can help to protect your eyesight by reducing unnecessary strain on your eyes during appointments. Intense focus on very fine details for long periods of time can have a detrimental effect on your eye health, as well as causing headaches and fatigue.
We’d recommend using glasses with around 3x or 4x magnification. The most convenient option is to use a specialist pair with a lens that you can flip out of the way. Or, if you prefer, you can try using strong drugstore reading glasses with a +3.00 prescription.
Focus on Your Lighting
Having the right isolation tweezers might be important, but they won’t be much use to you if you can’t see what you’re doing. Good lighting by your lash station can make all the difference to the quality of your application.
Keep it Bright!
When it comes to lashing, too much shadow in your workstation is something to avoid at all costs. Not only do shadows make it difficult to see and pick up smaller lashes, they also lead to low-quality photos of your finished work. You want to make sure your lighting lets you see every lash, from every angle.
Invest in lighting that can be positioned directly over the client’s face, and is bright enough for you to see tiny lashes very clearly without straining your eyes.
Prioritize Flexibility
Make sure you invest in a lamp that lets you change the angle and intensity of the light. It’s worth considering the setup of your lash station, and how much room you have to play with. You don’t want to lose half your workspace to a bulky tripod stand!
Look for lighting with a flexible ‘neck’ that you can move around your station without too much trouble.
And depending on your work arrangements, you may also want a lamp that travels well between appointments: look for something that folds down easily, and comes with a travel bag.
Lashing vs Taking Photos
Finally, bear in mind that the best light to lash with may not be the optimum light for taking before-and-after photos of your clients.
For lash application, many artists’ preferred light is the Glamcor Elite X or Revolution X. They’re lightweight, flexible, and super easy to maneuver around your station. Not only that, they have two ‘arms’ of powerful LED lighting that you can adjust to minimize shadow as you lash.
Plenty of lash artists take their photos using their Glamcor light, with excellent results. However, if you find you’re struggling to capture your sets from the right angle or get the right effect, it might be worthwhile investing in a ring light.
A ring light will help you achieve flattering, full-coverage pictures of your clients’ lashes every single time. Many of them come with in-built phone holders, so you can position your camera perfectly without awkwardly leaning over the table or casting shadows over their face.
You can also use a ring light to lash with, and many lash techs do. However, bear in mind that they tend to be bulkier and may be harder to maneuver around your station.
Ultimately, finding the right lighting setup comes down to personal preference and what best suits your physical space. Just make sure that whatever you choose, it allows you to minimize shadow and isolate lashes with ease!
Lash Isolation: It’s About More than the Tweezers
 Hopefully this post has been a helpful overview of ways to up your lash isolation game.
Having a range of great isolation tweezers at your fingertips is an important first step. As you progress in your practice, you’ll get to know the combination of tools that works best for you.
Beyond your tweezers, though, there’s a whole range of things to take into consideration if you want to create high-quality sets with excellent retention. Getting comfortable with how you maneuver your clients’ lashes – and asking them to shift position when you need them to – is crucial for better isolation. Don’t risk harming the natural lashes by cutting corners at this stage.
Finally, lash isolation is a painstaking task that requires precision and focus. If you’re lashing for 8+ hours a day, you need to make sure you don’t neglect your own comfort and health – headaches don’t tend to help with accurate isolation! Investing in the right lighting and magnification setup will pay dividends for your practice in the long run.
For more tips on how to lash faster and better, check out our other posts on the JB Lashes Pro blog.

